Showing posts with label organic herb container garden. Show all posts

Sunday, November 29, 2015

11 Tips for Harvesting and Preserving Fresh Herbs

Whether you grow them for their many medicinal purposes, for use in the kitchen, or simply for their beauty and fragrance – herb gardening can be a lot of fun!  Knowing when to plant and how to care for your herbs is half of being a successful gardener.  Often more important is knowing the proper techniques for harvesting your precious herbs.  Read on for some priceless tips and tricks that will help you get the most out of your garden.

1. The One Third Rule
For most herbs, you never want to harvest more than one third of the entire aerial growth at one time. This ensures that the plant will have plenty of leaves to regrow itself afterward.  However, there are some exceptions to the rule.  Chives, for example, grow back faster if  all of the leaves are cut off within an inch to a half inch from the ground.  Many species in the mint family (including catnip and lemon balm) regrow more efficiently if all of the stems are harvested at once – cut above the first or second set of leaves from the base of the crown.

2. When to Begin Harvesting
The earliest time that its safe to harvest your herbs varies from plant to plant.  Here are some of the most commonly grown herbs and their corresponding ages or times of year to begin harvesting:

Basil – Once the plant reaches 6 – 8” in height.
Chives – As soon as the leaves are thick enough to use.
Cilantro – Once stems are 6 – 12” long.
Lavender – Harvest at any time once stems have flowered.
Lemon Balm – Leaves may be harvested at any time during the growing season.
Oregano – Sprigs may be harvested once the plant reaches 3 – 4” tall.  Best in mid-summer.
Parsley – Any time after mature leaves appear.
Peppermint – Harvest at any time during the growing season.  Best just before blooms appear.
Rosemary – May be harvested at any time.
Sage – Harvest only lightly during the first year of growth.  Second growing season and thereafter, harvest any time year-round.
Tarragon – Any time after new growth begins in spring.
Thyme – Harvest at any time.  Best just before blooms appear.


3. How to Harvest
Different types of plants have different preferred methods of harvesting.  Leafy annuals like basil should be gathered by pinching off bunches of leaves from the tips of the stems.  Be sure to clip stems close to a leaf-pair so as not to leave a stub.  This will help the plant to regrow and encourage bushier plants with more tender leaves for the next harvest.  Herbs with long stems like cilantro, parsley, lavender, and rosemary should be cut near the base of the plant – about an inch from the ground.  Leafy perennial herbs such as oregano, thyme, sage, and tarragon can be harvested by the stem or sprig.

4. Flower, Seed, or Leaf?
Some herbs may be harvested for multiple purposes.  Knowing when and how to harvest these plants for your specific purpose may require a bit of finesse.  Cilantro, for example, has a short life-span that progresses rapidly from seedling to flower and seed. If your goal is to harvest cilantro for its leaves, you’ll have to keep an eye on these plants.  Once they bolt, leaves become scarce and the herb will have to be replanted.  However, if your desire is the coriander, you’ll want to wait until the flowers form seed pods then trim the entire stems and place them upside in a paper bag to dry.

Herbs such as lavender and echinacea which are grown primarily for their flowers should be harvested just before the blooms are fully opened for a more potent and longer lasting aroma.

Other herbs like basil and fern-leaf dill are commonly encouraged to produce more leaves by removing flower stalks once they appear.  Herbs such as oregano, thyme, and mint are most flavorful just before they begin to bloom, making this the best time to harvest their leaves.

Many herbs can also be allowed to go to seed in order to propagate themselves.  Cilantro / coriander is very easily replanted this way throughout the growing season due to its large seed pods.  Parsley is another herb that is easily harvested for its seeds as they grow in bunches on the ends of the plant’s flower stalks.  Some herbs like basil and oregano have tiny seeds which are best harvested by clipping off matured flower stalks and allowing them to dry in a cool, dark, protected environment.

5. Harvesting Clippings
On the topic of propagation, there are many herbs which may be harvested and regrown from clippings.  Some good examples are basil, rosemary, and mint.  Lovely leafy basil clippings are made by cutting off a few long stems, removing all but two to three leaf-pairs as well as any flower stalks, then placing the stems in water to root.  Rosemary and mint clippings may be taken from fresh new growth, trimmed of extra leaves (to form a long-stemmed sprig), then planted directly into damp soil.


6. Knowing When to Stop
Some perennial herbs can be harvested year-round like cold-hardy thyme and rosemary.  Others should be allowed a rest period before the first frost so the plants aren’t stressed before they go into dormancy.  For leafy perennials like sage and mint, you’ll want to do your last big harvest about two months before the first expected frost then harvest only lightly from that point on unless your herbs are in pots and you plan to bring them inside for the winter.

7. Drying Herbs

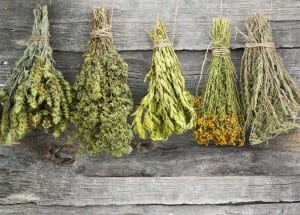
This is probably the most popular and widely-used method for preservation of harvested herbs. Drying works well for woody-stemmed herbs like rosemary, oregano, and lavender.  Simply cut off long stems, bundle, and hang them up to dry.  When harvesting herbs for drying, make certain that they are free of dew to avoid mold growth.


Alternately, you can use a food dehydrator to quickly preserve your fresh herbs without the risk of contamination.  These handy machines have a long list of other great uses as well.

8. Oil and Butter
Add cut herbs to olive oil or make herb-flavored butters to preserve them.  This technique cuts down on wilting and discoloration, and often seals in flavors better than other methods.  Just remember that your herbs must not have drops of water on them when they are added to oil, otherwise you run the risk of bacterial contamination.  To be extra safe, you may want to dry your herbs using one of the methods listed above before adding them to oil or butter.


9. Preserve With Vinegar
Herbs can also be preserved with vinegar.  Save bottles and corks to reuse for this technique.  Simply add your fresh herbs like rosemary, tarragon, or basil to clean glass bottles and fill with a vinegar of your choice.  Remember that your herbs will have to compete with the flavor of the vinegar they are stored in.  Try mild white vinegar for more delicate herbs.  For powerful herbs like rosemary or basil, use full-bodied vinegar like apple cider vinegar.

10 Freezing Herbs

For tender leafy herbs like basil and mint, freezing them tends to preserve their flavors better than drying.  There are three excellent methods for doing this:

Paint the leaves with oil and store them flat in a resealable freezer bag.

Chop up your herbs in a food processor or blender with a little bit of oil to form a paste. Wrap in wax paper and freeze. Then, when you’re ready to use your preserved herbs, simply cut off however much you need and replace the rest back in the freezer.

A clever way to freeze herbs without oil is to chop them up and drop the pieces to ice cube trays filled with water. When you’re ready to use them, simply pop out a cube or two and thaw your herbs as needed.


11. Salt and Sugar
Use salt to preserve herbs like rosemary, tarragon, marjoram, and oregano.  Alternate layers of salt and whole leaves in a jar (or other resealable container) pressing firmly between layers until the jar is full.  Alternately, add about 6 tablespoons of herbs to one cup of coarse ground salt in a blender and mix until well incorporated.  Store salted herbs in air-tight containers until ready to use.

For sweet herbs like mint, use sugar instead of salt for a flavorful treat!

Saturday, October 10, 2015

CONTAINER GARDENS MADE FOR THE SHADE

We all seem to have that dark corner of our garden or porch that looks uninviting, cold, and in major need of color. Have no fear—Janet Loughrey offers solutions for livening up that shady area, including insights into the best plant combinations that will thrive in low light.

Nearly every gardener has experienced the problem of too much shade, which can cause plants to become too leggy or fail to thrive. Whether it's a wooded suburban lot or a north-facing apartment balcony, low light means more growing challenges. Rather than being problematic, these dark areas can be viewed as an opportunity. (See more articles about shade gardens.)

Pots in this shaded entry garden are grouped together for greater impact. Phyllostachys nigra (black bamboo), offers structure and height. Other plants include ‘Kong’, ‘Sedona’ and ‘Chocolate Mint’ coleus, ‘Mardi Gras’ and ‘Margarita’ sweet potato vines, and ‘Bonfire’ begonia. (Photo by: Janet Loughrey. Design by: JJ De Sousa.)


Adding containers to shady spots is a practical way to optimize these spaces. By using brightly colored or shiny metal pots, combined with lighter or contrasting hues of foliage and flowers, these decorative arrangements can brighten up even the darkest corner of a porch, deck, or entryway.

A stump is cleverly recycled as the base for a shallow log container that blends perfectly with the landscape. The emphasis is on woodland foliage, with hart’s tongue and deer ferns, moss, and native sedums. A small hellebore and Hosta ‘Tiny Mice’ complete this serene combination. (Photo by: Janet Loughrey. Design by: Vina Winters.)


Choosing the right plants is essential to successful shade gardening. Woodland natives, ferns, and hostas are just a few plants that prefer lower light levels. Many garden specimens will thrive equally well in containers, given the right conditions. A single plant, such as Japanese maple or bamboo, can be just as compelling as a combination.

For shade containers, Vina Winters chooses a foliage specimen such as Hypoestes (polka dot plant) and pairs it with a similarly hued flower such as tuberous begonia. Soft shield and maidenhair ferns provide contrasting texture and shape. (Photo by: Janet Loughrey. Design by: Vina Winters.)


Plants with attractive foliage offer reliable season-long color. Coleus are workhorses of the shade garden, with a nearly endless array of colors. Other reliable foliage standbys include Japanese painted fern, sweet potato vine, and Rex begonias.

A north-facing wall is softened by this hanging planter of pink impatiens and fuchsias flanked by ‘Kingswood Torch' coleus. Asarina (climbing snapdragon) adds height, while ‘Margarita’ sweet potato vines trail gracefully over the side. (Photo by: Janet Loughrey. Design by: Lucy Hardiman.)


An underutilized alternative to annual bedding impatiens is Torenia (wishbone flower), which blooms consistently over several months in colors of blue, purple, pink, and yellow. Other prolific bloomers include fuchsias and begonias such as ‘Bonfire’.

This secluded riverside retreat is adorned with million bells, impatiens, and ferns. ‘Religious Radish’ coleus and ‘Bonfire’ begonias in a pot alongside the bench provide a dramatic burst of color. (Photo by: Janet Loughrey. Design by: Cheryl Borden.)


Optimal growing conditions are essential to healthy shade container plantings. Landscape designer Lucy Hardiman uses high-quality potting soil, replenishing it annually. She mixes a time-release fertilizer into the top several inches of soil before planting. Because containers need frequent watering during hot summer months, nutrients quickly leach out of the soil. In midsummer, Hardiman supplements with a water-soluble bloom booster fertilizer every other week.

The crimson hue of mophead hydrangeas is echoed by red tuberous begonias planted in a teal, ceramic pot. Coleus ‘Wizard Sport’, black mondo grass, and creeping Jenny create a layered effect. (Photo by: Janet Loughrey. Design by: Vina Winters.)


There are no hard and fast rules to mixing and matching plants for shade containers. Breaking the rules can result in some unexpectedly delightful surprises.


Thursday, September 24, 2015

Organic Container Gardening Tips

Growing plants in containers can be the perfect solution for gardeners with limited space. But even if you have an abundant in-ground garden, you might appreciate the flexibility of growing organic plants in pots.

Brighten up a patio or deck with colorful flowers, grow your own vegetables, or create a rooftop garden. You can move the pots around to capture the sunlight and move them to the shade when it gets too hot. Hailstorm? No problem — just move the containers inside.


For people who live near wildlife, like Debbie Christopher of Estes Park, Colo., growing in containers may be the only way to maintain a garden. “The deer and elk like to visit our yard and eat everything in sight,” she says. “Growing plants in pots on our enclosed deck is the only way we can enjoy a garden.”

Type of container

Most nurseries offer a huge selection of terracotta, ceramic and plastic pots, but container gardening also offers the perfect opportunity to recycle something from the garage or basement. Watering cans, spatterware bowls, buckets, kitchen canisters, vintage cowboy boots, tires and even an old footed bathtub can all be used as planters.

You’ll want to consider how much weather the pot can handle; an old can that is prone to rust wouldn’t be appropriate in a rainy climate, for instance. Also, consider the size of plantings you’ll be adding; If you are going to grow vegetables, for example, the pot will need to be large enough to hold plenty of water and allow roots to develop.

“Beware of decorative planters that lack drainage holes,” says John Pohly, Colorado State University Extension Horticulturist. “This creates water-logged soil and rotting roots. Research shows that the old practice of placing a layer of gravel in the bottom of the container, to give some room for water to accumulate without saturating the soil, doesn't really work. If you want to use a decorative planter that doesn't have a drain hole, put your plants in a regular flower pot and place that inside the decorative container.”

Depending on what material the container is made of, you may also be able to drill or punch holes in the bottom of it. You can also recycle a used plastic milk jug or soda bottle as a pot liner; just punch drainage holes in the bottom with a nail.

Growing medium

You can buy special organic container mix at many garden centers, or you can make your own by amending dirt from your garden for container gardening; simply mix together one part garden soil, one part compost and one part sand. You may also want to add some peat moss, which will help the mixture hold water. To improve drainage you can also add organic perlite, which lightens the soil mixture and has a neutral pH.

What to plant

People grow nearly every plant under the sun in containers. Most annual flowers are well suited for organic container gardening, and their long blooming season makes them ideal candidates for pots.

You can also successfully grow many vegetables in containers; just remember that most will grow best with about six hours of sunlight a day so you’ll need to place them in a fairly sunny location. Look for special dwarf varieties of tomatoes developed just for patios, and compact cherry tomatoes and peppers are also good choices for container gardens.

Lettuce, greens, spinach, herbs, onions and carrots all grow well in pots. If you provide a trellis or vertical support, you can also grow trailing vegetables like beans, peas and cucumbers.

More tips for success

PLANTING: Just before planting, wet the soil mix well; you can do this in a bucket or wheelbarrow, or you can even add water to the bag if you’re using a premixed organic potting soil. Arrange the plants in the pot, add the soil around them, and gently pat it down around the plants. Don’t fill the soil too close to the top of the pot; you want to be able to soak the plants well without water overflowing.

WATERING: Most container plantings tend to dry out quickly and will need very regular watering; during hot spells they may even need to be watered twice a day. Hanging baskets are especially prone to evaporation and should be watered until the water runs out of the bottom of the pot; wait until the soil is barely dry to water again.

During extreme heat or a weekend away you can temporarily put the pots in a tray with standing water, but don’t leave them longer than a day or two or the roots may rot.

FERTILIZING: Flowers and vegetables grown in containers will benefit from regular feeding throughout the growing season. With their promises of giant crops and big blooms, it may be tempting to use nonorganic bagged potting soil mixes and commercial fertilizers, but it’s just as easy to utilize organic growing techniques with container gardening and reap the benefits of pesticide- and chemical-free vegetables and naturally grown flowers and plants.

There are many organic fertilizers available that can safely be used on container plantings; many are fish- or compost-based. Worm castings are also an excellent organic fertilizer for container plants and they are good for indoor houseplants as well, since the mixture is relatively odor-free.

CONTROLLING PESTS: Troublesome insects are a fact of life when gardening. Since garden bugs do the most damage when plants are stressed or starting to wilt, be sure to keep them well watered. The best way to rid plants of pests like aphids is just to remove the pests with your hands. You can also move the container to your kitchen sink and use your water sprayer to spray the plants — especially under the leaves — to remove bugs.

If you have a large infestation, mix equal parts of water and liquid detergent in a spray bottle and spray the bugs. There are also commercial organic pest sprays you can buy; it’s best to apply these mixtures in the cool of the evening rather than in the hot sunshine when they can damage delicate foliage.

MAINTENANCE: Deadheading will keep flowers looking fresh, and removing dead leaves will help control bugs. One of the best aspects of container gardening is its forgiving nature; if a plant isn’t thriving or starts to wither, you can use a garden spade to carefully remove it and simply plant something else in its place.