Showing posts with label organic vegetables. Show all posts

Monday, November 23, 2015

11 Plants That Repel Mosquitoes

The days are finally getting longer, the snow is (slowly!) beginning to melt, and spring officially arrives in just a few days! While the prospect of warmer weather has us all a bit giddy, we can’t forget the unwelcome intruders that tag along with the sunny summer weather.

Yes, we are talking about mosquitoes, and everybody knows that they can be a huge nuisance. However, using chemical products to keep them away is not on the top of everyone’s wish list.

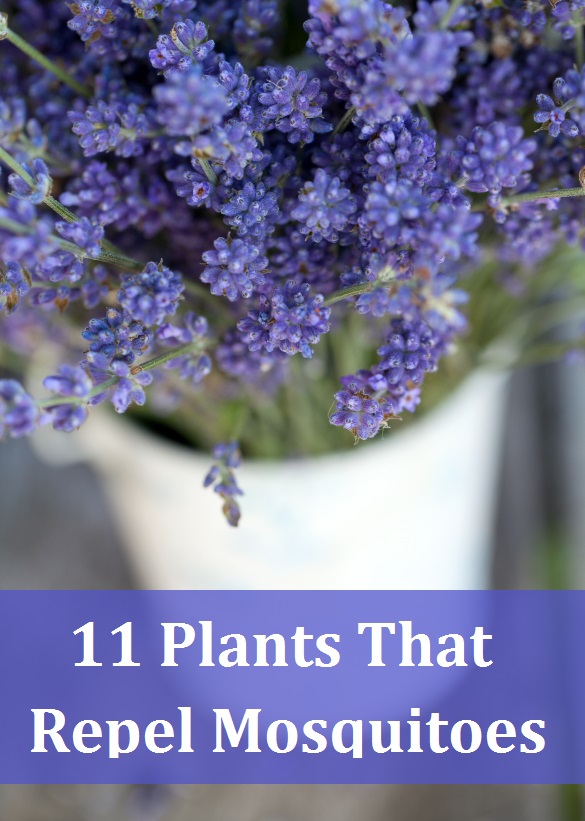
Read on for some ideas of plants that repel mosquitoes – naturally!

Citronella

Chances are, you’ve heard of this one before- it’s one of the most common ingredients in most mosquito repellents. Strange enough though, many people don’t even know that citronella is actually a plant! Citronella is a beautiful perennial clumping grass that emits a strong aroma. That aroma masks other scents, and keeps mosquitoes from being attracted to things located around it. The citronella plant has a much stronger aroma than other mosquito repellents that contain citronella, so it is a great choice. Citronella is very easy to grow, and can get to be a very tall 5 or 6 feet high! You can grow citronella in pots and place it around a porch or patio, or you can plant it directly in a yard or garden bed. It’s a great choice for repelling mosquitoes naturally.

You can actually buy two large live citronella plants from this page on Amazon. There’ll be no need to wait for seeds to grow – you can start repelling mosquitoes immediately.
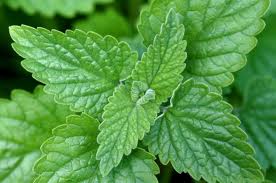
Lemon Balm

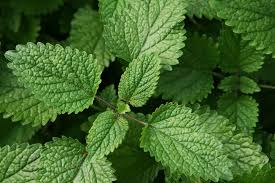
Another great choice for a mosquito repelling plant is lemon balm. A member of the mint family, the plant also known as horsemint and beebalm is a very easy plant for beginning gardeners to grow- even if you don’t have a green thumb! Lemon Balm is a very hardy plant, it resists drought, and it grows well even in shade. It is a very fast growing and sometimes aggressive plant, so you might want to contain it to a pot, where you can move it to wherever you like to ensure that it doesn’t take over your garden! An added bonus? You can dry the leaves and use them to make a delicious herbal tea!

Catnip

Your feline friends will be happy to know that catnip is a great mosquito deterrent! In fact, in a 2010 study, researchers found that catnip is 10 times more effective than DEET, the ingredient commonly found in bug repellents. It is a very easy plant to grow, and if you have cats in the house, they will surely be happy to have it around. However, be careful not to plant catnip in with other flowers, veggies, or herbs if you have cats around your garden. They will surely roll around in the catnip and smash everything nearby!

Marigolds

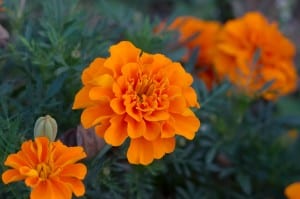
A bright, hardy annual plant, marigolds are a great choice for repelling mosquitoes. Marigolds contain Pyrethrum, an ingredient found in many insect repellents, and they have a unique aroma which bugs find repulsive. The flowers themselves are beautiful and can make a great border or addition to any flower bed! Try placing them around borders of your home, and mosquitoes might not want to cross over!


Basil

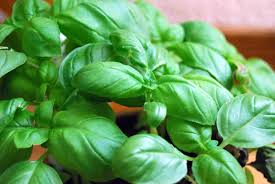
Calling all cooks! Want a double whammy when it comes to mosquito protection? Plant some basil! Not only will you have a quick and easy mosquito repellent, you will also have a delicious fresh herb on hand to add to all of your favorite recipes! There are many different varieties of basil around, so feel free to experiment and find the ones that you like best. Many expert gardeners recommend trying lemon basil or cinnamon basil to deter insects.


Lavender

You probably know that lavender is a gorgeous purple flowering plant with a soothing, calming scent. But, did you know that it is also a natural mosquito repellent? Grow it indoors near a sunny window, or outside in your garden or flower bed to keep the bugs away. While you’re at it, make a delicious herbal tea, or use lavender to fill your home with a wonderful calming aroma.


Peppermint

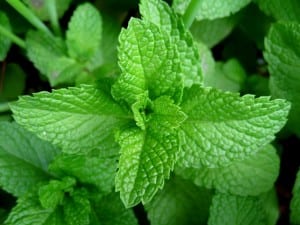
Most bugs despise the smell and taste of peppermint, so planting it around your home is a great way to keep them from dropping by uninvited! Plus, if you do happen to get bitten, peppermint leaves rubbed directly onto the skin make a great itch relief treatment! Added bonus for the wonderful minty smell that makes a delicious addition to food and beverages!


Garlic

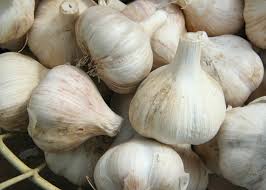
Unfortunately for all of us who love Italian food, studies have shown that EATING garlic does not repel mosquitoes. (Unless, however, you were to eat a HUGE amount!) However, having garlic around DOES! Make sure to add some garlic to your flower bed or vegetable garden for added protection!


Pennyroyal

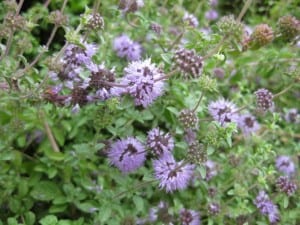
The adorable pennyroyal flower is a natural deterrent for mosquitoes! Make sure to plant some around your flowerbeds! Pennyroyal plants also make great groundcovers, and they attract a plethora of beautiful butterflies. Some people even use pennyroyal to flavor certain fish dishes. As you can see, this plant has plenty of benefits!


Rosemary

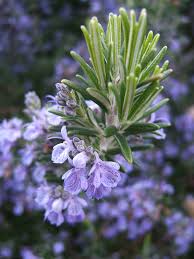
Rosemary is a beautiful flowering plant that is often used to flavor lamb or fish dishes, but did you know that it is also a natural mosquito repellent? It’s perfect to add to your herb garden or flowerbed to keep bugs away, and it even attracts butterflies!

Plus you can simply snip a few springs off every time you need to add extra flavor to your lamb or steak!


Geranium

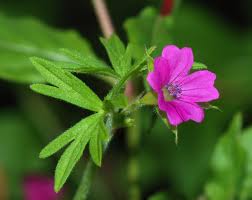
This beautiful flowering plant is a great choice for mosquito repellent. When planted in a hanging container, the colorful blooms will cascade over the side of the pot, providing a beautiful visual piece as well as a very useful bug repellent!

As you can see, there are many different plants out there that can help to keep bugs away! Next time you reach for the chemical bug spray, take a minute and think again, and choose something more natural!


source : http://www.naturallivingideas.com/11-plants-that-repel-mosquitoes/

Thursday, November 19, 2015

5 Tips in Storing Your Winter Squash

Most farmers and gardeners are in love with winter squash. They love to plant and grow winter squash because it can be easily stored and it can last long even during winter. Winter squash just like the summer squash are planted and grown from spring until the summer season. The only difference is that, winter squash takes more time to mature compared to the summer squash varieties. While summer squash is harvested during the summer, the winter squash varieties are harvested during fall.

Here are 5 Tips in Storing Your Winter Squash
source: gardenbetty

1. Curing  

If you want your winter squash to last through the winter, then, it must be properly cured. To do this, you need to make sure that your winter squash will have the right water content value before it is stored for the winter. You can easily achieve this by putting your freshly harvested squash in a dry and sunny area for about a week or two.

source: sustainablemarketfarming

2. Storage Conditions  

You can store your squash in a shelf, cabinet, or a drawer it’s up to you. Just make sure that the storage temperature is at 50 degrees Fahrenheit and you store them in a dark place.

source: nwedible

3. Wrap Them  Up

Wrap your squash individually in a paper before storing them. Make sure that your wrapped squash do not touch each other and is not placed in a hard surface.

source: agreenroutine

4. While in Storage  

Check your stored squash regularly. Make sure that your squash have no soft spots in them and check for damaged fruits. To avoid bruising, turn the squash every time you check them.

source: mlive

5. Longevity of Stored Squash

When stored properly, winter squash can last until February. If you notice that your stored squash starts to get soft, then, it is a sign that your squash should be taken out and prepared to be cooked and to be eaten.


Tuesday, November 17, 2015

7 Secret Tricks to Get the Most Produce Out Of Your Vegetable Garden

Do not let a limited garden space hamper your dreams of abundant harvest. Having a small area to work with does not mean you cannot harvest more crops. In reality it is doable! You just need to work a little bit more to make this dream turn into a reality. Here’s how to do it.

7 Secret Tricks to Get the Most Produce Out Of Your Vegetable Garden


1. Build Up Your Soil

If you want to extract more yields from your vegetable garden, the first thing you need to do is to build up your garden soil. The best thing to accomplish this task is to add organic matter to your soil. Aged animal manure and organic compost will do the trick. After you have finished adding organic matters into your soil, the next thing to do is to make raised beds. Raised beds can yield you up to four times more than just planting and growing crops in rows. Using raised beds will maximize the space in your garden resulting in much greater yield.


2. Round Out Your Beds

It is not enough to just make raised beds in your garden. The shape of your beds will also play an important part. Since raised beds are more space efficient, the best thing to do to your raised beds is to make sure that the top of the bed is rounded to form an arc. This may seem not a big deal but once you start planting and growing your crops, you will see a big difference in terms of planting space and crop yield during harvest.


3. Spacing is the key

The way you plant your crops is also a big factor to get the maximum amount of crop yield from each of your garden beds. Instead of planting your crops in square patterns or rows, why not plant them like forming a triangle. Planting in a triangle pattern can add about 12 percent more plants to each of your garden beds.


4. Use Vertical Gardening

If you have a small garden space to work with, you can still plant more crops by going vertical. Plant vine crop vegetables such as tomatoes, beans, squash, melons, peas, and other vegetable crops that grows vertically. Just make sure to support your vertical garden by using trellis, fences, stakes, or anything that can be used in vertical gardening.


5. Mix It Up

If you really want to maximize your garden space, then, interplanting crops is a great way to do it. Plant corn together with pole beans and squash in the same area in your garden. The corn will serve as a support once your pole beans start to climb while the squash can grow freely on the ground and serves as protection to competing weeds.


6. Plant in Succession

Growing more than one crop in the same space in the garden is also a great way to get the most out of your garden. During the planting season, do some succession planting in your garden. This way you can harvest up to about four different crops from a single area. You can do this by planting different crops that grows and matures fast. For example, If you plant and harvest lettuce, you can follow it up by planting corn, then, followed by some fast maturing greens. This is done within the same planting season.


7. Stretch Your Season

You can stretch your planting season by growing crops that matures fast. Lettuce, kale, turnips, and tomatoes are just some of the examples. You can also stretch your planting season by making sure your soil is warm enough and have a good air circulation even during the colder months. Do this by applying mulch around your plants, putting row covers, or using cold frames to protect the crops in your garden.

source by : http://freshorganicgardening.com/7-secret-tricks-to-get-the-most-produce-out-of-your-vegetable-garden/6/

Friday, November 13, 2015

How to grow vegetables and herbs the organic way


To prepare your organic growing area – whether it is a pot, single bed or a large allotment – see Managing your soil and Home composting. It will help you to create the perfect soil - that has nutrients and texture to provide life for your plants.

The best place to start is by downloading the Organic Growing Guidelines. These are a code of practice, designed with a helpful traffic light system, to help you on your organic growing journey - whether you are a complete beginner, want to convert to organic, or be reminded of good organic practice.

Our How to Grow cards cover a selection of vegetables, fruit and herbs – from artichokes to apples and turnips and thyme. See also weed management, and how to cope with pests and diseases the organic way.

Preparing your organic growing area
Your first battle might be with weeds. These compete with other plants for light, nutrition and water, so you need to clear them before you start growing. If your plot is small, you can dig the weeds out, making sure you remove the whole plant, plus root.

However,if your growing area is large, don’t try clear it all before planting. Hours of digging will only lead to back ache and the depressing sight of weeds returning. And if you resort to a blast of weed killer (glyphosate formulations), you are using toxic chemicals on the very area you want to grow your healthy fruit and veg.

Instead, divide the plot in half. One half you will dig, in the other you will feed the soil by using an organic mulch ie covering the soil to exclude light.

For the mulched half, cut down the larger weed foliage to just above soil level using a satisfying slash technique (you can use much of the foliage on your new compost heap, so long as there are no seeds). Then cover the area with a mulch that will exclude light. You can use a variety of materials to do this – a really thick layer of compost or well rotted manure (at least 15 cms deep) is ideal. This is known as the No Dig method. This can be topped by cardboard (add another layer of manure so it doesn’t blow away), or a black plastic membrane, pinned down. (Don’t use carpet – many of the dyes have toxic chemicals that can leach into your precious soil.) Leave this for at least 6 months. It’s that simple. You don’t have to do a thing, as the weeds will weaken in the dark and the earthworms do their work to enrich the soil.

Now dig the area where you want to start growing. Take out tough and woody weeds like docks, thistles, nettles and brambles, removing all the roots. See FAQs for how to deal with bindweed or brambles.

Then add as much compost as you can - one big wheelbarrow, or 5 large buckets, for every 5 square metres of ground. Dig this compost into the top 10 cms of soil, and your bed is ready for planting. If you want to sow seeds, use a rake to break down and gently flatten the topsoil into a fine texture (known as tilth) so the seeds can access soil and water to germinate.

If you are growing in containers, prepare your organic growing medium according to the plants you plan to grow. See Container growing.

Planning your planting
To grow vegetables organically, it’s important to plan what to grow and when - known as crop rotation. Changing where you grow each vegetable from year to year helps maintain good soil structure, ensures sufficient nutrients, helps to control weeds, and prevents a build up of pests and diseases.

You can devise your own rotation, just remember to keep a record of what you have grown, where and when. We show below a typical crop rotation process, which also includes when to add compost or grow green manures.

Firstly, divide your growing area into four or more sections. Then divide your crops into families (see below). If you keep the plants in these families together (such as potatoes and tomatoes), but move them around the different sections each year, you will have a successful crop rotation.

Vegetable Families

Alliums: Onion, garlic, shallot, leek
Brassicas: Brussels sprouts, cabbage, cauliflower, kale, kohl-rabi, oriental greens, radish, swede and turnips
Cucurbitaceae: courgettes, marrows
Legumes: Peas, broad beans, French and runner beans
Potato (Solanum): Potato, tomato
Roots: Beetroot, carrot, celeriac, celery, Florence fennel, parsley, parsnip (nb swedes and turnips are brassicas)
The charts below show an example of a 4-year rotation, including over winter planting, green manures and when to add compost.


Don't forget to leave space for perennials – such as rhubarb and asparagus – as well as many herbs, such as thyme, marjoram and mint (although the latter is best grown in a container to prevent it spreading!)

Now you are ready to grow!

Garden Organic is offering an introductory course focusing on how to start planning your organic garden - looking at crop rotation, ground preparation and more. Courses are held at Ryton Gardens throughout 2016 on 10 February, 13 April, 14 September, and 16 November. Further details and how to book here

See also the How to Grow cards for individual vegetables and herbs. Also see Pests and Diseases and Weed management. Soon you will be Harvesting and storing, as well as saving your seeds. We hope you enjoy the organic way. Not only are you safe from chemicals, but you are encouraging a healthy life for you, the plants and the planet.


Harvesting and storage Tips


Picking and eating your own organic vegetables and fruits are the joyful outcome of growing. In these pages we help you store your organic produce – either in times of glut, or to tide you through the winter.

The right conditions are crucial for successful storage of any crop, and the produce itself needs to be in perfect condition – no blemishes, or breaks in the skin. It is easy to bruise fruit and veg as you harvest them, and once they are no longer growing they have no means to heal.

Different crops, such as root crops, potatoes, alliums, beans, cabbages, leeks, tomatoes, pumpkins, apples, pears all need different storage conditions. You can also freeze many fruit and vegetables.

‘Root’ crops (except potatoes)
i.e. Carrots, parsnips, beetroot, turnip, swede, kohlrabi and celeriac

Interestingly, these roots are the storage organs of biennial plants and therefore - in the right conditions – they store naturally and easily. Harvest carefully, taking care to avoid skin damage. Remove excess soil, but do not wash or scrub as this may damage the skin. Remove leaves by twisting off close to crown. Place in shallow crates/boxes separating layers with a slightly damp packing material such as leaf mould, sand, sieved soil, sawdust (from untreated wood only), coir. Keep very cool from 0 - 4°C.

Potatoes
Require slightly different conditions from ‘root’ crops. They must be kept dry and dark to prevent them turning green – which is when they develop high levels of solanine, a toxic alkaloid. Harvest in dry, cool conditions if possible, and leave exposed to dry for a few hours. Remove any damaged tubers; store good ones in thick paper sacks closed at the neck to conserve moisture. Do not use plastic sacks - the humidity will be too high, which stimulates sprouting. Protect from low or freezing temperatures and store at 5°- 10°C.

Alliums – onions, shallots and garlic
Harvest onions and shallots when all the leaves have fallen over naturally. Dig out garlic when just the first 4 or 6 leaves turn yellow. Keep in a hot dry place for a few weeks (if the weather is fine, they can stay outside resting above the ground.) Bulbs are ready to store when skins are dry and papery. Plait into ropes or hang in net sacks which allow the air to circulate freely. Protect from freezing, ideal temp 2 - 4°C.

French and runner beans
If you can’t keep up with the harvest, either freeze or leave some pods to set seed . When the pods are dry, shell out the dry beans and store them in a jar.

Cabbages
Firm red and white winter cabbage will store for several months if harvested before the first frost. Leave roots intact or at least 15 cm of stem. Place on slatted shelves, covered with straw or thick layers of newspaper if temperatures drop. Ideal temp 0 - 4°C.

Leeks and Brussels sprouts
Both can normally be left in the ground over winter. However, if extremely bad weather is forecast you can bring a few indoors for immediate use. Dig up entire plants, with roots, and place in a bucket with just enough water to cover the roots. In a cool place they will stay fresh up to a week.

Tomatoes
Pick green tomatoes before first frost – ripen either by hanging the whole vine in a cool dry place, or by wrapping individual fruit in paper and storing in trays. You can hasten the ripening by putting them in a closed bag or box with a ripe apple or banana.

Pumpkins and winter squashes
Pumpkins and squashes need a few weeks of sun towards the end of the growing season to develop a tough skin for storage. Harvest before first frost. Cut with a long stalk, with part of the vine attached – this will protect the stem from rotting. Stored cool and dry with plenty of air circulation they can last 6 – 9 months. Ideal temp 10 - 15°C.

Apples
It is essential to pick and handle apples with care. Only store perfect fruits. Store in cool, dark and slightly damp conditions. Either place fruits on vegetable crates or slats – taking care they do not touch each other or wrap each apple in paper ensuring fruit is completely covered and put gently into boxes. In all cases, check fruit regularly and remove any bad or diseased ones.

Pears
Can be difficult to store well for any length of time. As with apples, it is essential to pick and handle with care. Pick just before fully ripe and store in cool conditions without touching or wrapping, on slatted shelves.

For further examples of storage for individual vegetables and fruit see The HDRA Encyclopaedia of Organic Gardening (Dorling Kindersley).

Freezing
Vegetables such as cauliflower, broccoli, peas and beans, leeks can be frozen to help store during a glut. It is best to blanch in boiling water first, and to freeze in manageable quantities. Apples, pears and plums should be stewed first. Strawberries do not freeze well – they go mushy when thawed – but raspberries can be quick frozen individually on trays, before bagging up. Tomatoes are best cooked into a sauce before freezing.


Thursday, September 24, 2015

Growing vegetables in containers in organic garden

Growing vegetables in containers is easy, fun, and can save you money on groceries. Most vegetables traditionally grown in a yard can be grown successfully in containers. Choose containers large enough to hold the root systems of the plants you intend to grow. Vegetables grown in containers require daily watering, adequate drainage, and access to sunlight to thrive. Vegetable container gardening is a great way of introducing children to the joys of gardening and the benefits of eating fresh produce.


Growing vegetables in containers is becoming an increasingly popular hobby. It doesn’t require much space and, with a little care and attention, can generate enough produce to meet the vegetable needs of most small families. Follow this guide to vegetable container gardening and start enjoying the benefits of home-grown organic produce.

Getting started

Begin by choosing a suitable location to accommodate your container garden. Even though containers are easy to relocate, it’s important to start with a location that you know will provide your plants with sunlight and protection from climatic extremes.

Consider what you’d like to grow and in what quantity. You’ll get the most enjoyment out of your vegetable container garden if its

Containers

Choose containers that are large enough to hold the plants you intend to grow. Be careful to ensure that the containers you select accommodate the root systems of your chosen plants.

Available space and crop selection will determine the size and number of containers you’ll need. While small 6-10in diameter pots are appropriate for growing some herbs and even miniature tomatoes, you’ll need larger 15-25in containers to grow vegetables in.

Almost any type of container can be used if it provides good drainage through holes on the sides or bottom. Plastic or clay pots, old pails, bushel baskets, plastic buckets, wash tubs, wooden planters, or hanging baskets will hold vegetable plants.

Hanging baskets (perfect for growing strawberries) are a good way of using vertical space. Their height also affords plants additional protection from insect pests.

Vegetable selection

Just about any vegetable that will grow in your backyard garden will fair well as a container-grown plant.

Vegetables best suited for containers include tomatoes, peppers, summer squash, eggplant, green onions, beans, lettuce, radishes, parsley, and herbs.

Choose vegetable varieties specifically developed for growing in small spaces, for example those with compact, bush, or dwarf growth habits.

Seeding and transplanting

You can purchase transplants from local nurseries or grow them at home from seed. Both options are easy and uncomplicated.

Seedlings can be germinated in a range of different trays and containers – cutoff milk cartons, disposable trays, or old baking pans can be used to grow seedlings in.

Make sure the tray or containers you choose are at least 3 inches deep to allow room for roots to grow and have small holes for drainage so roots won’t rot in soggy growing mix.

Fill containers with an organic soil starting mix and cover seeds with ½ inch of soil. Position germinating seeds in a warm area that receives good sunlight.

Transplant seedlings in around 6-8 weeks when they develop their first five or six leaves. Be careful not to damage young root systems’ of seedlings while transferring to containers.

Soil

Container gardens require good quality soil that drains well, yet does not dry out too fast. Plain garden soil is inappropriate. It drains poorly in containers and, without worms and other living creatures to aerate it, becomes compacted quickly.

Choose a soil that has a loose texture and contains good quantities of coarse sand and organic matter. There are many high quality commercially-prepared organic varieties that will do the job well.

Pots, hanging baskets, and planter boxes can be heavy to move or suspend and are much easier to handle if soil weight is kept to a minimum. Select a light-weight growing mix.

Growing mixes containing perlite, a lightweight volcanic material heated to high temperatures to make it expand, is an excellent lightweight substitute for sand that provides much better drainage.

In hot and dry locations where soil moisture retention look for soil mixes containing vermiculture (heat expanded mica). This is a good lightweight substance for increasing the moisture retention ability of container soils.

Drainage

Inadequate drainage is one of the major reasons for vegetable container gardens failing. Most modern containers provide for adequate drainage but if not, you can always make some of your own holes.

If holes need to be made, drill four or more 1/4-inch holes evenly spaced around the bottom of the container.

To further help drainage, put about 1/2-inch of coarse gravel, small stones, or pieces of a broken clay pot in the bottom of each container. These items are not a substitute for drainage holes, however.

Watering

Vegetables grown in containers require routine watering. Aim to keep the soil moist but not waterlogged. One watering per day is generally sufficient.

Waterlogged soil starves plant roots of oxygen while dry soil causes plants to drop flowers and leaves. Monitor drainage and soil moisture retention.

Add mulch to the soil to minimize water loss if needed. Compost, straw, pine needles, grass clippings, and shredded bark are effective options.

Hanging baskets are extremely prone to drying out. Water twice daily in hot dry conditions. Treat window boxes in a similar way to hanging baskets.

Sunlight

Access to sunlight is important for producing quality vegetables. Most vegetables grow and produce best when grown in full sunlight.

Leafy vegetables (lettuce, cabbage, greens, spinach, and parsley) tolerate more shade than root crops (radishes, beets, and onions). Plants that bear fruit, such as cucumbers, tomatoes, peppers, and eggplant, require the most sun.

Ensure your organic vegetable container garden has access at least 5 hours of sunlight each day. If the containers you’re using aren’t too large, take advantage of the mobility afforded by container gardening to access additional sunlight where necessary.

Fertilizer

Supplying organic vegetable plants grown in containers with the nutrients they require is an important part of keeping them healthy and productive.

Vegetable plants grown in containers generally have shorter, more compact root systems than their yard-grown counterparts. This makes it more difficult for them to obtain adequate nutrition.

An organic liquid-based fertilizer can assist in overcoming this problem. A good quality liquid-based organic fertilizer will contain the important nutrients and micro-nutrients vegetable plants require.

Avoid the temptation to apply too much liquid fertilizer. Excessive amounts of nitrogen, phosphorus, and potassium causes salt build up and other problems.

Harvesting

Harvest vegetables as soon as they’ve reached full maturity. This is the time that they’ll be brimming with flavour and just waiting to be served. Avoid harvesting vegetables too early.

At the end of the harvest season, discard the plant and soil from the pot. Avoid the temptation to reuse the same soil for a second season of production. Infected soil or mix will spread disease into the second season unless it is properly composted. Properly composted planting media can be reused.

Pests and diseases

Vegetables grown in containers come under attack from the same insects and diseases that are common to any vegetable garden.

Routinely check plants for diseases and insects. Given the small numbers involved, physical removal of insect pests is generally sufficient. Treat plant diseases in the same way you would had the vegetables been grown in your yard.